UDS and XCP Starter Challenge
UDS and XCP Starter Challenge
Challenge Walkthroughs
These challenge are within a simulation on VSEC Test. Below are the detailed walkthroughs on how to complete each challenge.
Please use the UDS and XCP Starter Challenge simulation for these challenges.
Run Discovery in VSEC Test (1 points)
Under extendeDiagnosticSession what is the Service name for ID 0x3E?
Walkthrough
- Sign-in to vsec.blockharbor.io
- Navigate to Test on the sidebar menu to enter the VSEC Test application and then select the Discovery submenu.
- Click the
Start discoverybutton at the top to open a prompt to begin Discovery. - Select the UDS and XCP Starter Challenge simulation from the dropdown as the Bench.
- Select vcan0 to choose which interface to run Discovery on.
- Click the
Start Discoverybutton to start the discovery scan. - Wait 3-5 minutes for Discovery to return results. Click the eye ( ) icon to view detailed results of the Discovery scan.
- Scroll down and expand the
extendeDiagnosticSessionDiagnostic Session to obtain the service name for ID 0x3E.
ANSWER
TESTER_PRESENT
TesterPresent (0x3E) keeps a non-default diagnostic session alive, preventing ECU timeout back to default session.
Build a Test Plan in VSEC Test (2 points)
What is the name of one of the free CAN Test cases?
Walkthrough
- Sign-in to vsec.blockharbor.io
- Navigate to Test on the sidebar menu to enter the VSEC Test application and then select the Test Plans submenu.
- Click the
+ Add test planbutton at the top to open a prompt to create an empty Test Plan.- Name (required) - Enter a generic name for the Test Plan
- Description (optional) - Enter a detailed description of the test plan
- After the Test Plan has been created, click on the Test Plan to add Test Cases to it.
- Click the
+ Add test casesbutton at the top to open a prompt to select Test Cases. - Select the Test Cases to add to the Test Plan then click the
Add casesbutton. - A new Test Plan has not been created with the free CAN Test Cases. Use the name of any of these Test Cases for the answer.
ANSWER
UDS Security AccessORCCP UploadORXCP Upload
A Test Plan can have multiple of the same Test Cases with different parameters set.
Executing a Test Plan in VSEC Test (3 points)
Why does the UDS Security Access Test Case fail?
The Build a Test Plan in VSEC Test challenge needs to be completed before starting this challenge.
Walkthrough
- Sign-in to vsec.blockharbor.io
- Navigate to Test on the sidebar menu to enter the VSEC Test application and then select the Test Runs submenu.
- Click the
+ Add test runbutton at the top to open a prompt to configure the Test Run.- Bench (required) - Select the UDS and XCP Starter Challenge simulation
- Test plan (required) - Select the Test Plan created in the Build a Test Plan in VSEC Test challenge
- Test name (required) - Enter a generic name for the Test Run
- Description (optional) - Enter a detailed description of the test run
- Wait 5-10 minutes for the Test Run to complete. Click the eye ( ) icon to view detailed results of the Test Run.
- Read the results for the UDS Security Access test case to obtain the answer.
ANSWER
Security Access Insufficient Seed Length
The answer is the title of the result.
Can you find the interface? (5 points)
What is the name of the CAN interface available on the virtual terminal?
Walkthrough
- Sign-in to vsec.blockharbor.io
- Navigate to Test on the sidebar menu to enter the VSEC Test application and then select the Simulations submenu.
- Select the UDS and XCP Starter Challenge to open a terminal on the simulation.
- Type the command
ip linkto view the list of interfaces. - Look for the virtual CAN interface for the answer.
ANSWER
vcan0
The
ip link command can view all available network interfaces on a specified device.Arbitration (5 points)
What is the Arbitration ID of the CAN frame being sent periodically on the CAN interface?
The ‘Arbitration IDs in 11-bit classic CAN range from 000 to 7FF
Walkthrough
- Sign-in to vsec.blockharbor.io
- Navigate to Test on the sidebar menu to enter the VSEC Test application and then select the Simulations submenu.
- Select the UDS and XCP Starter Challenge to open a terminal on the simulation.
- Type the command
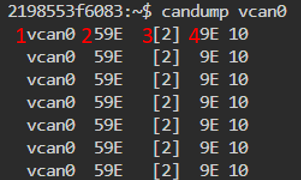
candump vcan0to see a dump of the CAN virtual network. - From the output determine the Arbitration ID of the CAN frame.
ANSWER
59E
The ‘candump’ command can be used to view CAN data on a specified interface.
Candump
This command is used to read and print out data received by a CAN (Controlled Area Network) interface. You can read more about what candump has to offer here.
Walkthrough
- vcan0 is the sniffer device
- 59E is the arbitration ID
- [2] is the size of the CAN packet
- 9E 10 is the can data
Data Field 1 (5 points)
How many bytes of data are in the data field of the CAN frame being sent periodically on the CAN interface?
CAN frames contain a “Data Length Code” that is 4 bytes long.
Walkthrough
- Sign-in to vsec.blockharbor.io
- Navigate to Test on the sidebar menu to enter the VSEC Test application and then select the Simulations submenu.
- Select the UDS and XCP Starter Challenge to open a terminal on the simulation.
- Type the command
candump vcan0to see a dump of the CAN virtual network. - From the output determine how many bytes of data are in the data field.
ANSWER
2
The
candump command can be used to view CAN data on a specified interface.Data Field 2 (5 points)
How many bytes of data are in the data field of the CAN frame being sent periodically on the CAN interface?
The Data field in classic CAN may contain up to 8 bytes of data.
Walkthrough
- Sign-in to vsec.blockharbor.io
- Navigate to Test on the sidebar menu to enter the VSEC Test application and then select the Simulations submenu.
- Select the UDS and XCP Starter Challenge to open a terminal on the simulation.
- Type the command
candump vcan0to see a dump of the CAN virtual network. - From the output determine the data in the data field.
ANSWER
9E10
Message Frequency (5 points)
What is the frequency that the periodic CAN frame is transmit at? (in Hz)
The different options available in
candump can allow you to see more information about each received CAN frame. Use man candump or candump -h to get more information on the usage of candump.Walkthrough
- Sign-in to vsec.blockharbor.io
- Navigate to Test on the sidebar menu to enter the VSEC Test application and then select the Simulations submenu.
- Select the UDS and XCP Starter Challenge to open a terminal on the simulation.
- Type the command
candump -t z vcan0to see a dump of the CAN virtual network with a timestamp.- -t flag provides a timestamp in different formats. (a)bsolute/(d)elta/(z)ero/(A)bsolute w date)
- z used to start from zero and increment up from there.
- From the output observe the first column showing the timestamp on each message. The increment in these messages will provide the answer.
ANSWER
1
Viewing the data with the timestamp flag will assist in the information needed.
Crypto - pow pow! (20 points)
I signed my flag, thats pretty much the same as encryption, right?
pub_e = 65537
pub_n = 27130058966678375728118690628915085193505679921867847648180394177280300520851322209827953313677610995977175396855400115719997248093217978788791475794191309606741245965521564249520758557425707716276357612383008262150259072257782913410617175802499340022388447047629022386881255413171331856263374853843961598744215379945538726953506454859112787839466674350352298690863753069032704210896554984332177790093120515590458961735089368466550753534317073220559703261053361251093853868715391272704827131460657841223647599202717920842362378900859386228898179814271143542598798022604629591665790726585192070387959726079579927264339
signature = 4172204809297405811985500677636732349089473540889855289757337736512303070584208009356148963914969296139250262532036044670829787749340381486502259003934029518250084291211843615602473277568939725661998743287881104315586743909166094376545879628924755210696938802618107247235991939968132055218667508994013042802832653274036857030938271120371493508056689333496510130233288415153533743215499505779621204995381781585793891494891361783339201260743345041742788508748141553059420124837675803038062487182700364305742864198416705040747639989644160240694540025745969599421913149372250571544665491768421384384768919101583170066211
Walkthrough
- Sign-in to vsec.blockharbor.io
- Navigate to Test on the sidebar menu to enter the VSEC Test application and then select the Simulations submenu.
- Select the UDS and XCP Starter Challenge to open a terminal on the simulation.
- Create a new file named
pow.pyand open it via thenano pow.pycommand. - Paste the Python Script below into the file and then press
ctrl + x, then selectyto save it. - Run the scrypt with the
python pow.pycommand to obtain the answer.
ANSWER
signing_is_not_encryption!
Because verifying a signature mathematically recovers the original message, anyone holding the public key can read a raw RSA signature.
Pyhton Script
pub_e = 65537
pub_n = 27130058966678375728118690628915085193505679921867847648180394177280300520851322209827953313677610995977175396855400115719997248093217978788791475794191309606741245965521564249520758557425707716276357612383008262150259072257782913410617175802499340022388447047629022386881255413171331856263374853843961598744215379945538726953506454859112787839466674350352298690863753069032704210896554984332177790093120515590458961735089368466550753534317073220559703261053361251093853868715391272704827131460657841223647599202717920842362378900859386228898179814271143542598798022604629591665790726585192070387959726079579927264339
signature = 4172204809297405811985500677636732349089473540889855289757337736512303070584208009356148963914969296139250262532036044670829787749340381486502259003934029518250084291211843615602473277568939725661998743287881104315586743909166094376545879628924755210696938802618107247235991939968132055218667508994013042802832653274036857030938271120371493508056689333496510130233288415153533743215499505779621204995381781585793891494891361783339201260743345041742788508748141553059420124837675803038062487182700364305742864198416705040747639989644160240694540025745969599421913149372250571544665491768421384384768919101583170066211

v = pow(signature, pub_e, pub_n)
print(v.to_bytes(32,'big'))
Python Script Breakdown
pub_e- Determines the encryption type, 65537 is RSA.pub_n- The public RSA key.v = pow(signature, pub_e, pub_n)- Recovers the signed message.print(v.to_bytes(32, 'big'))- Converts int to bytes and indicates to use big-endian when reading the message.
Crypto - The IFP (125 points)
Just decrypt my flag. I’ll even show you how I computed the values!
A system is only as strong as its weakest layer.
Walkthrough
- Sign-in to vsec.blockharbor.io
- Navigate to Test on the sidebar menu to enter the VSEC Test application and then select the Simulations submenu.
- Select the UDS and XCP Starter Challenge to open a terminal on the simulation.
- Create a new file named
solve_the_ifp.pyand open it via thenano solve_the_ifp.pycommand. - Paste the Python Solver Script from the ANSWER field into the file and then press
ctrl + x, then selectyto save it. The script:- Breaks the weak (128-bit) RSA key apart to rebuild the private key;
- Uses private key to unlock the AES key;
- Then uses that AES key to unlock and print the flag.
- Run the scrypt with the
python solve_the_ifp.pycommand to obtain the answer.
Key size is everything in RSA. Used 2048-bit or greater keys instead of a 128-bit key.
Proving Grounds - Course Completion
20%
Last updated on