UDS Challenge
Challenges
These challenge are within a simulation on VSEC Test. Below are the detailed walkthroughs on how to complete each challenge.
Simulation VIN (40 points)
Retrieve the VIN of the simulation using UDS.
Walkthrough
- Sign-in to vsec.blockharbor.io
- Navigate to Test on the sidebar menu to enter the VSEC Test application and then select the Simulations submenu.
- Select the UDS Challenge to open a terminal on the simulation.
- Use tmux to create 3 seperate terminals which we’ll run different commands in.
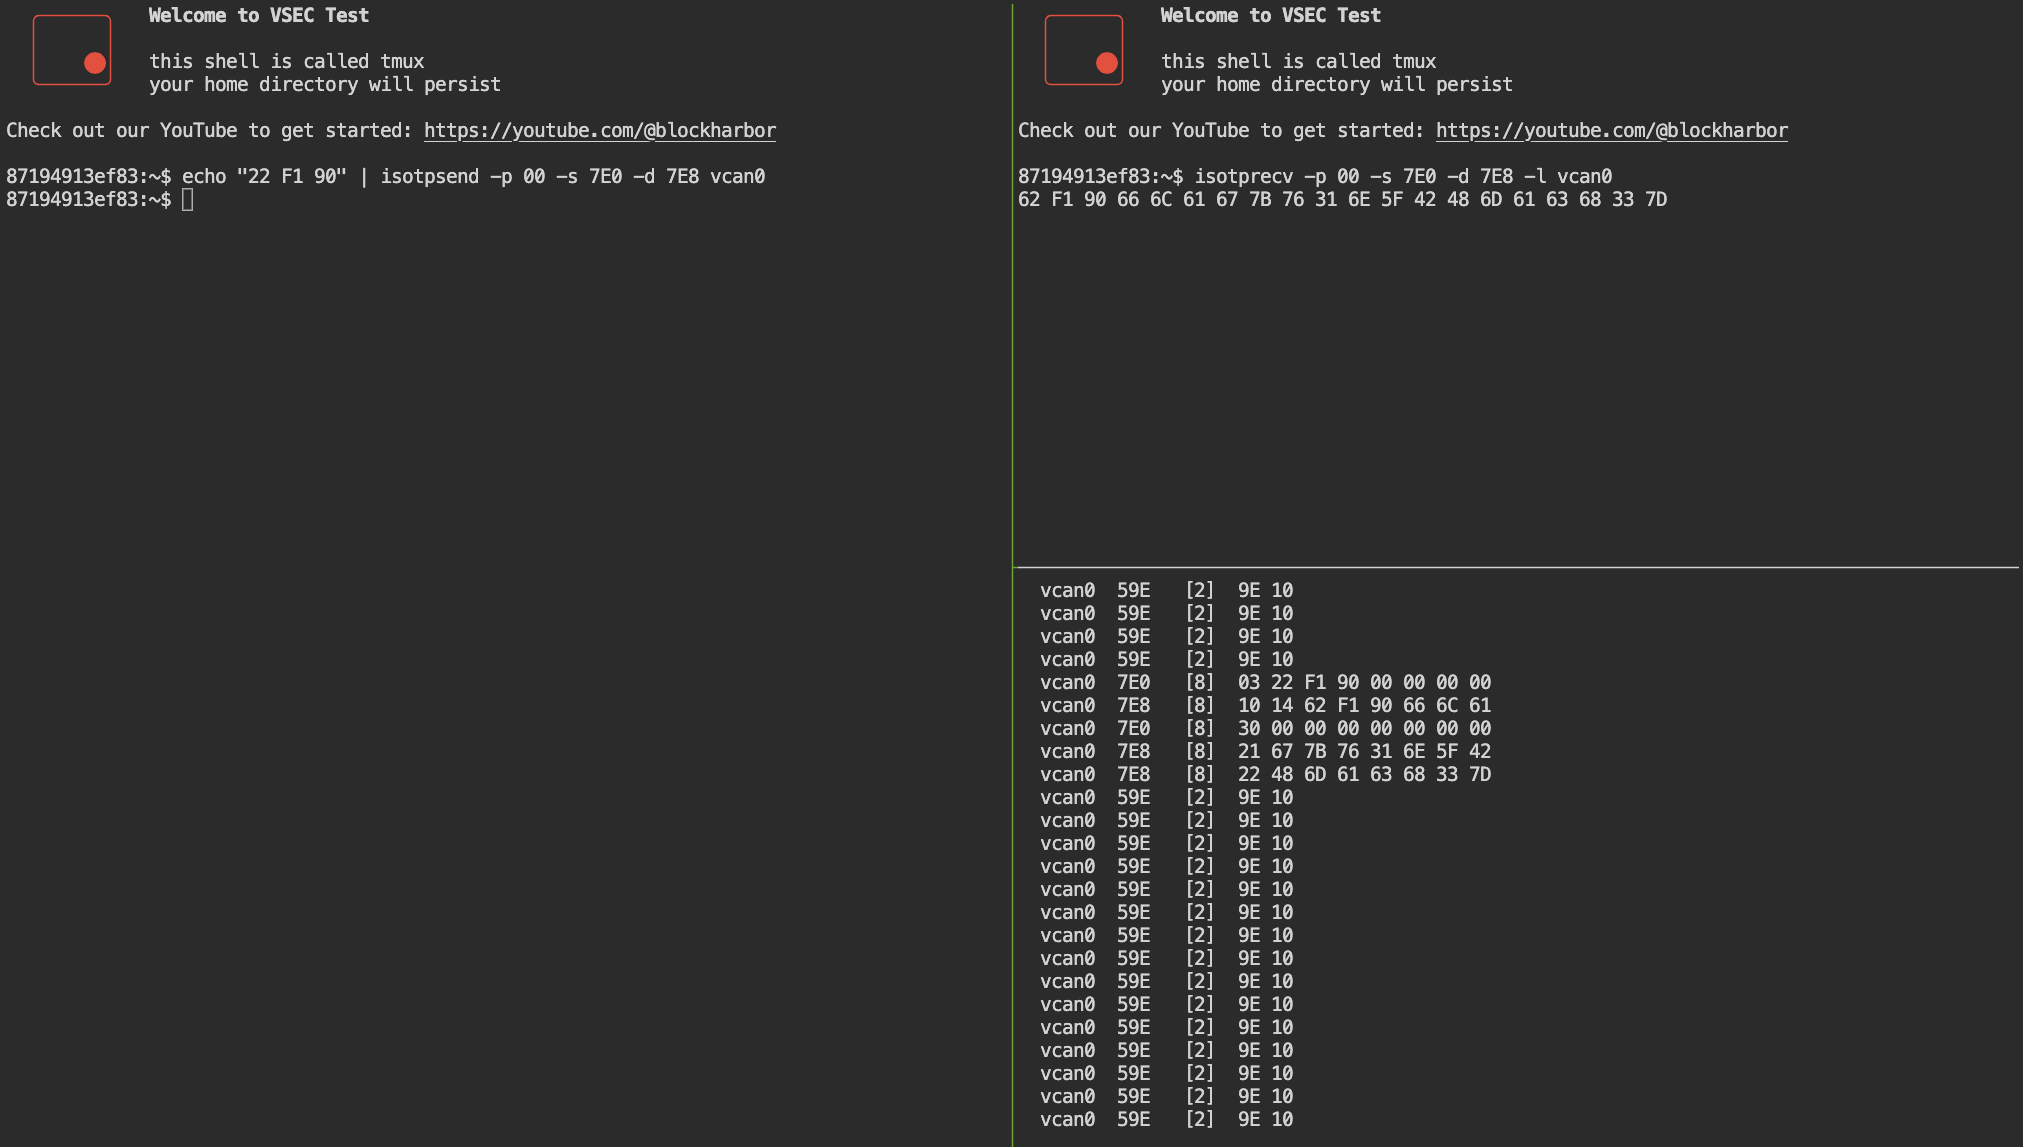
- In the terminal(s) run the following commands in the order below
- Terminal #1 -
candump vcan0 - Terminal #2 -
isotprecv -p 00 -s 7E0 -d 7E8 -l vcan0-p 00- Pads the message with all zeros-s 7E0- Messages sent to 7E0-d 7E8- Messages replying with 7E8-l vcan0- Listen on vcan0
- Terminal #3 -
echo "22 F1 90" | isotpsend -p 00 -s 7E0 -d 7E8 vcan0echo "22 F1 90"- Data to be sent- 0x22 Service identifier - Read Data by Identifer
- 0xF190 VIN Data Identifier
|- Pipe output from echo command to isotpsend-p 00- Pads the message with all zeros-s 7E0- Messages sent to 7E0-d 7E8- Messages replying from 7E8vcan0- Send on vcan0
- Terminal #1 -
- Once you’ve sent those commands in different terminals in the order above, the
isotprecvcommand will show a response with the answer in HEX. - Convert
66 6C 61 67 7B 76 31 6E 5F 42 48 6D 61 63 68 33 7Dfrom HEX to ASCII to receive the answer.
ANSWER
Startup Message (50 points)
It seems the simulation broadcasts some diagnostic information on arbitration ID 0x7DF when booting up, what does this message say? (in ASCII)
Walkthrough
- Sign-in to vsec.blockharbor.io
- Navigate to Test on the sidebar menu to enter the VSEC Test application and then select the Simulations submenu.
- Select the UDS Challenge to open a terminal on the simulation.
- Use tmux to create 3 seperate terminals which we’ll run different commands in.
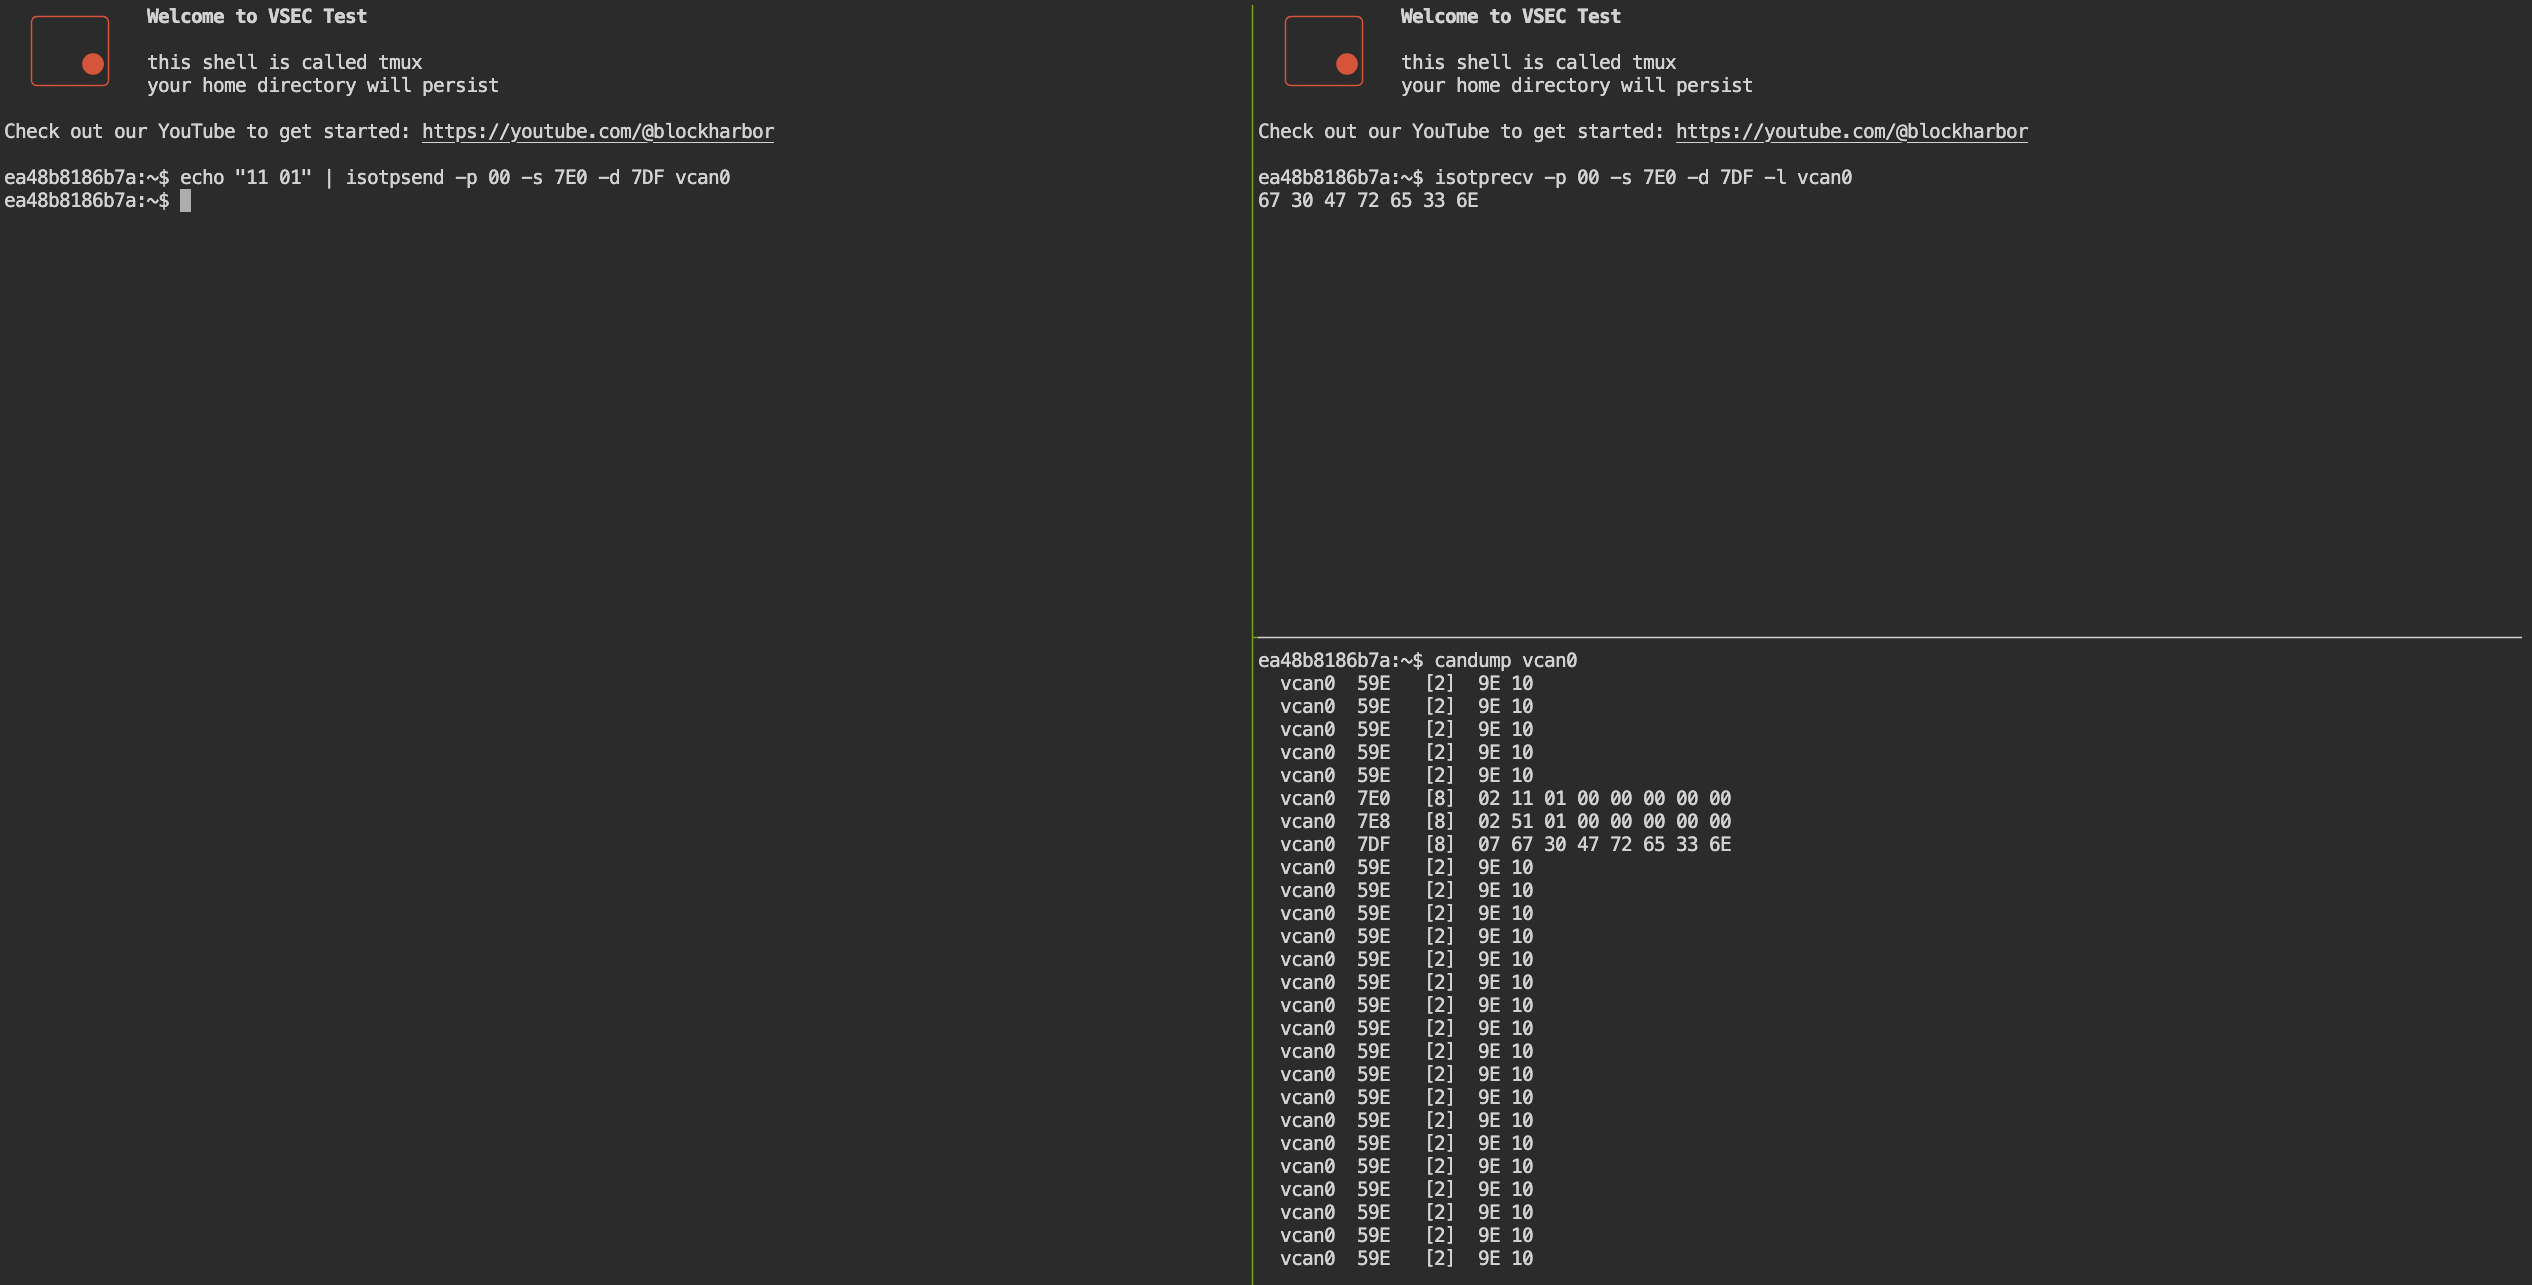
- In the terminal(s) run the following commands in the order below
- Terminal #1 -
candump vcan0 - Terminal #2 -
isotprecv -p 00 -s 7E0 -d 7DF -l vcan0-p 00- Pads the message with all zeros-s 7E0- Messages sent to 7E0-d 7E8- Messages replying with 7E8-l vcan0- Listen on vcan0
- Terminal #3 -
echo "11 01" | isotpsend -p 00 -s 7E0 -d 7DF vcan0echo "11 01"- Data to be sent- 0x11 Service identifier - Read Data by Identifer
- 0x01 Hard ECU Reset
|- Pipe output from echo command to isotpsend-p 00- Pads the message with all zeros-s 7E0- Messages sent to 7E0-d 7DF- Messages replying from 7DFvcan0- Send on vcan0
- Terminal #1 -
- Once you’ve sent those commands in different terminals in the order above, the
isotprecvcommand will show a response with the answer in HEX. - Convert
07 67 30 47 72 65 33 6Efrom HEX to ASCII to receive the answer.
ANSWER
Engine Trouble? (75 points)
The simulation’s engine light is on, can you read the diagnostic code?
Additional details for this challenge:
Walkthrough
- Sign-in to vsec.blockharbor.io
- Navigate to Test on the sidebar menu to enter the VSEC Test application and then select the Simulations submenu.
- Select the UDS Challenge to open a terminal on the simulation.
- Use tmux to create 3 seperate terminals which we’ll run different commands in.
- In the terminal(s) run the following commands in the order below
- Terminal #1 -
candump vcan0 - Terminal #2 -
isotprecv -p 00 -s 7E0 -d 7E8 -l vcan0-p 00- Pads the message with all zeros-s 7E0- Messages sent to 7E0-d 7E8- Messages replying with 7E8-l vcan0- Listen on vcan0
- Terminal #3 -
echo "19 02 88" | isotpsend -p 00 -s 7E0 -d 7E8 vcan0echo "19 02 88"- Data to be sent- 0x19 Service identifier - Read Diagnostic Trouble Code
- 0x02 Report DTC by Status Mask
- 0x88 Warning Indicator Request with confirmed DTCs
|- Pipe output from echo command to isotpsend-p 00- Pads the message with all zeros-s 7E0- Messages sent to 7E0-d 7DF- Messages replying from 7DFvcan0- Send on vcan0
- Terminal #1 -
- Once you’ve sent those commands in different terminals in the order above, the
isotprecvcommand will show a response with the answer. - The device responds back with
07 59 02 88 3E 9F 01 AB, where is the DTC is3E 9F 01.
ANSWER
Secrets in Memory? (100 points)
It seems the simulation allows access to only some off-chip sections of memory, are there any secrets in the visible memory?
0x23 - Read Memory by AddressThe memory region starts at 0xC3F80000 and the flag is in the format flag{...}.Additional details for this challenge:
Walkthrough
- Sign-in to vsec.blockharbor.io
- Navigate to Test on the sidebar menu to enter the VSEC Test application and then select the Simulations submenu.
- Select the UDS Challenge to open a terminal on the simulation.
- Use tmux to create 3 seperate terminals which we’ll run different commands in.
- In the terminal(s) run the following commands in the order below
- Terminal #1 -
candump vcan0 - Terminal #2 -
isotprecv -p 00 -s 7E0 -d 7E8 -l vcan0-p 00- Pads the message with all zeros-s 7E0- Messages sent to 7E0-d 7E8- Messages replying with 7E8-l vcan0- Listen on vcan0
- Terminal #3 -
echo "23 14 C3 F8 00 00 0F" | isotpsend -p 00 -s 7E0 -d 7E8 vcan0echo "23 14 C3 F8 00 00 0F"- Data to be sent- 0x23 Service identifier - Read Memory by Address
- 0x14 Address and Length Format Identifier - the first digit (1) is how many bytes long the Memory Size field is, the second digit (4) is how many bytes long the Memory Address field is
- C3 F8 00 00 Memory Address - the starting point of the memory region you want to read
- 0F Memory Size - how many bytes of data to read back (0x0F = 15 bytes)
|- Pipe output from echo command to isotpsend-p 00- Pads the message with all zeros-s 7E0- Messages sent to 7E0-d 7E8- Messages replying from 7E8vcan0- Send on vcan0
- Terminal #1 -
- Once you’ve sent those commands in different terminals in the order above, the
isotprecvcommand will show the bytes stored at that memory region in the response. - The flag may be far from the starting address, so you may need to request a large block of memory (increase the Memory Size) or script requests across several starting addresses. Convert the returned bytes from HEX to ASCII and look for the standard
flag{...}marker.
ANSWER
flag{...} format and may be located far from the starting address.Security Access Level 3 (150 points)
Can you find the key and break in?
0x27) is a seed-and-key challenge. The ECU will not accept it from the default session, so first switch to an extended diagnostic session (0x10) and keep it alive with Tester Present (0x3E), then request a seed, transform it into the matching key, and send the key back to unlock the level.Additional details for this challenge:
Walkthrough
- Sign-in to vsec.blockharbor.io
- Navigate to Test on the sidebar menu to enter the VSEC Test application and then select the Simulations submenu.
- Select the UDS Challenge to open a terminal on the simulation.
- Use tmux to create 4 seperate terminals which we’ll run different commands in.
- In the terminal(s) run the following commands in the order below
- Terminal #1 -
candump vcan0 - Terminal #2 -
isotprecv -p 00 -s 7E0 -d 7E8 -l vcan0-p 00- Pads the message with all zeros-s 7E0- Messages sent to 7E0-d 7E8- Messages replying with 7E8-l vcan0- Listen on vcan0
- Terminal #3 - Enter an extended diagnostic session. Service
0x27cannot be used from the default session.echo "10 03" | isotpsend -p 00 -s 7E0 -d 7E8 vcan0echo "10 03"- Data to be sent- 0x10 Service identifier - Diagnostic Session Control
- 0x03 Extended Diagnostic Session
|- Pipe output from echo command to isotpsend-p 00- Pads the message with all zeros-s 7E0- Messages sent to 7E0-d 7E8- Messages replying from 7E8vcan0- Send on vcan0
- Terminal #4 - Keep the session alive so the ECU does not time out and fall back to the default session.
while true; do echo "3E 80" | isotpsend -p 00 -s 7E0 -d 7E8 vcan0; sleep 1; doneecho "3E 80"- Data to be sent- 0x3E Service identifier - Tester Present
- 0x80 Suppress positive response (silent mode, keeps the
isotprecvwindow from filling with replies)
while ... sleep 1 ... done- Re-sends Tester Present every second so the session stays active
- Terminal #1 -
- Back in Terminal #3, request the seed for security access level 3.
echo "27 03" | isotpsend -p 00 -s 7E0 -d 7E8 vcan0echo "27 03"- Data to be sent- 0x27 Service identifier - Security Access
- 0x03 Request Seed (security access level 3, an odd subfunction)
|- Pipe output from echo command to isotpsend-p 00- Pads the message with all zeros-s 7E0- Messages sent to 7E0-d 7E8- Messages replying from 7E8vcan0- Send on vcan0
- The
isotprecvcommand will show a positive response beginning with67 03(0x27 + 0x40), followed by the seed bytes the ECU wants you to solve. If you instead see7F 27 7E, the ECU is still in the wrong session - re-check the session control in step 5.3 and confirm the Tester Present loop in step 5.4 is running. - Derive the key from the seed by performing a NOT operation on the seed - flip each individual bit, or use a NOT/bitwise-complement calculator.
- Send the key back using send-key subfunction
0x04(one higher than the request seed subfunction). Replace<key>with the bytes you calculated in the previous step.- Terminal #3 -
echo "27 04 <key>" | isotpsend -p 00 -s 7E0 -d 7E8 vcan0echo "27 04 <key>"- Data to be sent- 0x27 Service identifier - Security Access
- 0x04 Send Key (security access level 3)
<key>The NOT of the seed from step 8
|- Pipe output from echo command to isotpsend-p 00- Pads the message with all zeros-s 7E0- Messages sent to 7E0-d 7E8- Messages replying from 7E8vcan0- Send on vcan0
- Terminal #3 -
- A positive
67 04response means security access level 3 is unlocked.
ANSWER
The seed is random on every request, so there is no single fixed key - the key is always the bitwise NOT of the 2-byte seed (each byte XOR 0xFF).
Example: the ECU replies 67 03 A2 5B (seed A2 5B). NOT each byte -> 5D A4. Send 27 04 5D A4 and the ECU replies 67 04, confirming security access level 3 is unlocked.
Security Access Level 1 (300 points)
Can you provide a valid key for security access level 1?
0x27) is a seed-and-key challenge. The ECU will not accept it from the default session, so first switch to an extended diagnostic session (0x10) and keep it alive with Tester Present (0x3E), then request a seed, transform it into the matching key, and send the key back to unlock the level.Additional details for this challenge:
Walkthrough
- Sign-in to vsec.blockharbor.io
- Navigate to Test on the sidebar menu to enter the VSEC Test application and then select the Simulations submenu.
- Select the UDS Challenge to open a terminal on the simulation.
- Use tmux to create 4 seperate terminals which we’ll run different commands in.
- In the terminal(s) run the following commands in the order below
- Terminal #1 -
candump vcan0 - Terminal #2 -
isotprecv -p 00 -s 7E0 -d 7E8 -l vcan0-p 00- Pads the message with all zeros-s 7E0- Messages sent to 7E0-d 7E8- Messages replying with 7E8-l vcan0- Listen on vcan0
- Terminal #3 - Enter an extended diagnostic session. Service
0x27cannot be used from the default session.echo "10 03" | isotpsend -p 00 -s 7E0 -d 7E8 vcan0echo "10 03"- Data to be sent- 0x10 Service identifier - Diagnostic Session Control
- 0x03 Extended Diagnostic Session
|- Pipe output from echo command to isotpsend-p 00- Pads the message with all zeros-s 7E0- Messages sent to 7E0-d 7E8- Messages replying from 7E8vcan0- Send on vcan0
- Terminal #4 - Keep the session alive so the ECU does not time out and fall back to the default session.
while true; do echo "3E 80" | isotpsend -p 00 -s 7E0 -d 7E8 vcan0; sleep 1; doneecho "3E 80"- Data to be sent- 0x3E Service identifier - Tester Present
- 0x80 Suppress positive response (silent mode, keeps the
isotprecvwindow from filling with replies)
while ... sleep 1 ... done- Re-sends Tester Present every second so the session stays active
- Terminal #1 -
- This level builds on Security Access Level 3. The four-byte seed and rate-limited key attempts make the transform impossible to guess or brute force, so you first have to leak it out of protected memory - and that memory only opens once level 3 is unlocked. Complete the Level 3 walkthrough above so the module is in security access level 3.
- Switch into the session that exposes protected memory.
echo "10 02" | isotpsend -p 00 -s 7E0 -d 7E8 vcan0echo "10 02"- Data to be sent- 0x10 Service identifier - Diagnostic Session Control
- 0x02 Programming Session (only granted while security access level 3 is unlocked)
- A positive
50 02confirms the session. A7F 10 33(security access denied) means level 3 is not actually unlocked - repeat step 6.
- Request a seed for security access level 1. Beyond returning the seed, the ECU also stashes this seed and its matching key into protected memory as a reference pair.
echo "27 01" | isotpsend -p 00 -s 7E0 -d 7E8 vcan0echo "27 01"- Data to be sent- 0x27 Service identifier - Security Access
- 0x01 Request Seed (security access level 1, an odd subfunction)
- The
isotprecvcommand shows a positive response beginning with67 01(0x27 + 0x40), followed by four seed bytes.
- Read the protected memory region where the reference pair is stored using service
0x23- Read Memory by Address. Protected memory is mapped at0x1A000; the pair sits at offset0xC00, so read 12 bytes from0x1AC00.echo "23 14 00 01 AC 00 0C" | isotpsend -p 00 -s 7E0 -d 7E8 vcan0echo "23 14 00 01 AC 00 0C"- Data to be sent- 0x23 Service identifier - Read Memory by Address
- 0x14 Address and Length Format Identifier - 1-byte size, 4-byte address
- 00 01 AC 00 Memory Address -
0x1AC00 - 0C Memory Size - 12 bytes
- The response
63+ 12 bytes is: the 4 seed bytes, 4 zero bytes, then the 4 key bytes.
- XOR the leaked key against the leaked seed byte-for-byte. The result is the fixed 4-byte constant the ECU uses for level 1:
55 39 AA 17. From here the level 1 key is simplykey[i] = seed[i] XOR [0x55, 0x39, 0xAA, 0x17][i]. - Request a fresh level 1 seed if the previous one has expired (
27 01), compute the key with the constant, and send it back using send-key subfunction0x02. Replace<key>with the four bytes you calculated.echo "27 02 <key>" | isotpsend -p 00 -s 7E0 -d 7E8 vcan0echo "27 02 <key>"- Data to be sent- 0x27 Service identifier - Security Access
- 0x02 Send Key (security access level 1)
<key>The seed XORed with55 39 AA 17
- A positive
67 02response means security access level 1 is unlocked.
ANSWER
Level 1 uses a fixed 4-byte key transform: key = seed XOR 55 39 AA 17 (byte-for-byte). The seed is random on every request, so there is no single fixed key.
Example: the protected-memory read returns the reference pair seed 11 22 33 44 / key 44 1B 99 53; XORing them recovers the constant 55 39 AA 17. Later the ECU issues 67 01 10 20 30 40 (seed 10 20 30 40), so the key is 45 19 9A 57. Send 27 02 45 19 9A 57 and the ECU replies 67 02, confirming security access level 1 is unlocked.